
In my family Wednesday means pizza. Now I’m sure you’re asking yourself, “Today’s Friday. If Wednesday means pizza why wait two days?” The answer to this is simple, Wednesday was my son’s birthday so we juggled things around this week and did pizza Wednesday on Thursday. And I was too exhausted yesterday evening to string two sentences together so I put off writing this post till morning.
As you might imagine I like to make my own pizza. Mainly because I grew up in New York and I know from pizza and getting good pizza is hard. None of the chains do good pizza – they optimize for speed and consistency, not quality. Most of the pizza places I’ve eaten from do a crust that’s too thick to get crispy. There are some that do a decent job – there is a place we order from – but nothing beats pizza fresh out of the oven.
Before I get too far along I will admit that I’m too lazy to make my own sauce. Not just too lazy, pizza sauce is one of the things I’m not very good at making. I’ve nailed it once or twice through the years but never in a repeatable fashion. More often than not I end up with a freezer full of containers of sauce that are OK to use but not just right. So I cheat. I use jarred pizza sauce. And that’s OK.
Now that we’ve gotten the preliminaries out of the way we can talk about what really matters. Dough!

So the ingredients and preparation for this dough come from Patrick Ryan’s Sourdough Pizza Recipe. You take all the ingredients and mix them to a dough and shove it in the fridge for ~24 hours. About 90 minutes before you want to bake, take the dough out and bring it up to room temperature.
About 60 minutes before you want to bake slide your pizza stone into the oven and pump it up as high as it will go (mine goes up to 550°F/285°C). If you don’t have a pizza stone use a baking tray or baking pan upside down. The idea is to have a flat surface that you can slide the pizza onto and pull it off of. (I’ll do a post on Pizza Hardware later and talk about the benefits of pizza stones, why pizza peels are worth the money, and other related issues. But that’s a different blog post.) Just remember that the surface you’re putting the pizza on needs to be larger than the pizza.
After the dough has been out of the fridge for an hour or so (I usually give it about 90 minutes) knead it for about a minute. What I’ve noticed is that when I take the dough out of the fridge (and I apologize for not thinking to take a picture of it at this point) it isn’t quite as homogenous as I would like it to be and there are spots with congealed oil and kneading serves 2 purposes – first it mixes that oil in and creates a much more homogenous dough, second it deflates the dough. Once you’ve kneaded it you should have about 1,120g of dough (I say about because some will stick in the bowl and maybe on the counter no matter how well you flour it.) Split the dough into equal blobs, form them into balls, and let rest, covered, at room temperature for 30 minutes.
I usually do 4 280g balls and get 12″ pizzas from them. I’ve done 6 10″ pizzas from this recipe (and that’s what it suggests) but I’ve found that less is more in this case. When I do 6 10″ pizzas my family will eat it all and still be hungry – there’s less room for cheese and toppings on 6 10″ pizzas. Also, the more pizzas I’m baking the less time I’m spending with my family.
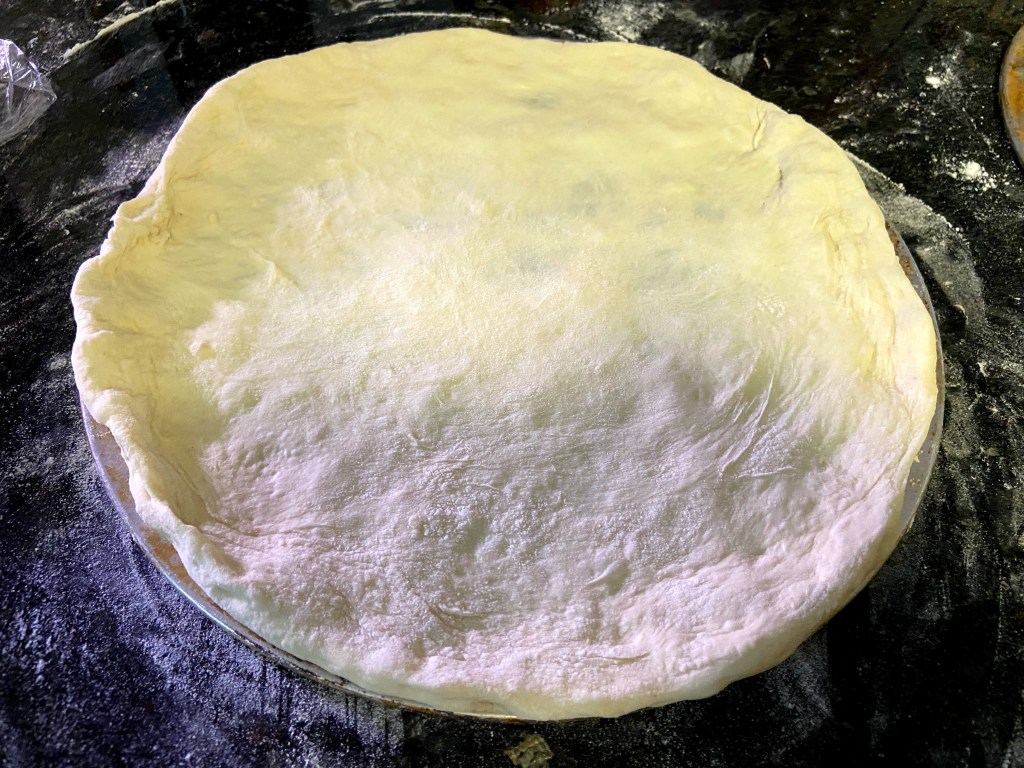
Once those dough balls have rested you need to flatten them out. I will not do a video showing how I do it because there are so many good ones out there by people who are much better at it than I am. Suffice it to say that through hard work and perseverance (OK, it’s not really that hard) I took that dough ball and made it into a pizza crust. If you take a good look at the picture you’ll see that the crust is pretty thin in the middle and much thicker around the edge. This is intentional – this gives us a crust that’s crispy in the middle and bread like around the edges. If we wanted a uniform crust (and this is one of my big problems with a lot of pizza places) we could just use a rolling pin.

Once we have our dough flattened it’s time to top it. We want a pretty thin layer of sauce. The sauce is there for flavor but we want a crispy crust so putting too much on it can make the dough soggy. For my 12″ pizza I use 2-3 soup spoons of sauce. Once you have your sauce on sprinkle on the cheese. Again, you don’t need to be heavy handed with the cheese and you don’t need to cover every square inch of the crust – the cheese will melt and spread itself out. One caveat on the cheese, if you’re using fresh mozzarella it doesn’t spread as much as the shredded, you might want to consider doing a mixture of both. If you want to put other toppings on now is the time. When I do toppings other than cheese I usually sprinkle a little bit more cheese on top of them.
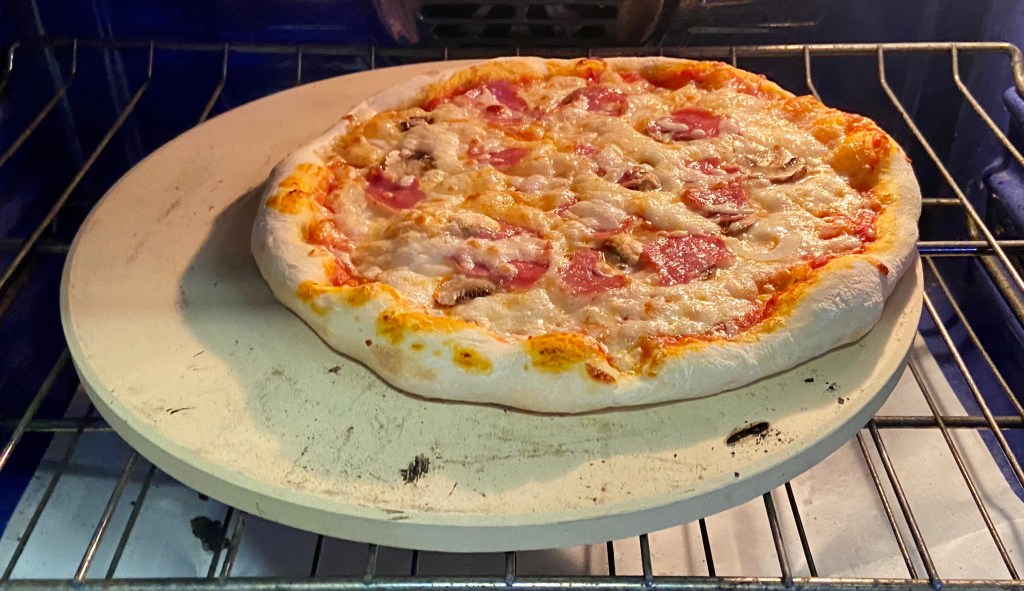
We have our pizza flattened, sauced, cheesed, and topped. Now it’s time to bake. At this point our oven should be as hot as it’s going to get (remember, we turned it on an hour or so ago to as high as it would let us.) Gently put the pizza on the pizza stone (or alternative from above) and set a time for 9 minutes. I don’t know if you noticed but I have a pizza screen under the dough while I’m working to make it easier to get the pizza in the oven and moved from point A to point B. If you’re using one of these devices I would recommend taking it out about halfway through the cooking process and letting the pizza finish on the stone by itself.

Once you take it out of the oven it’s time to cut, eat end enjoy!
